Hi. I’m Amelia, a waitress and art school grad from Australia. I’m a lover of fashion, food and all things DIY. I’ve decided to begin a blog in order to share some of my ideas, doings and wearings.
Up until a couple of months ago I had never heard of shoe clips before. If you haven’t either they are basically jewellery for your shoes. I had never seen them in shops and could only find a limited, expensive range of them online. Shoe clip findings were easy to find though! I got these off ebay for a couple of dollars (the packet came with 20).
They had a really great sale on at the jewellery store this week so I bought an assortment of things I could make some shoe clips with – let’s begin refashioning!
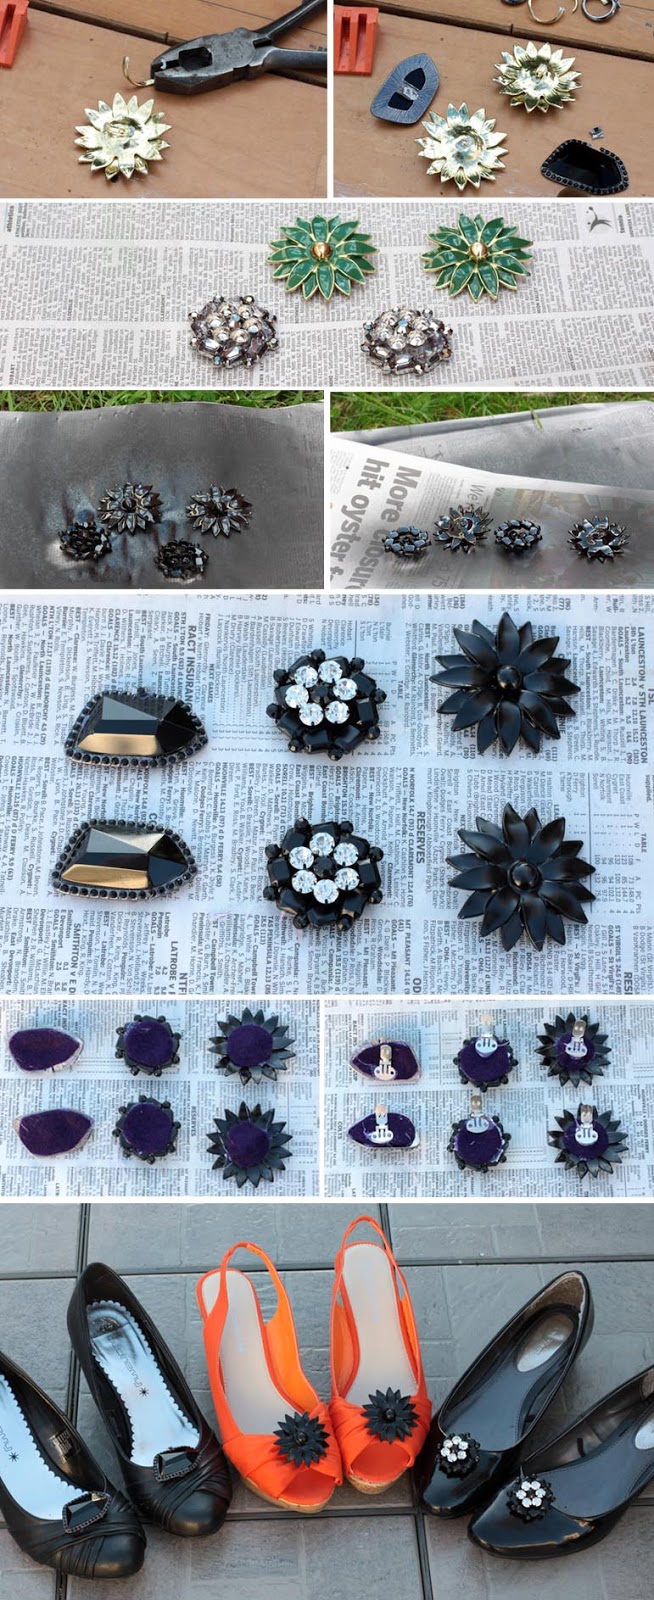
For my shoe clip refashion I chose some studs and a few different rings to work with. First I removed the posts from the studs by cutting them back with jewellery pliers. The remaining bit just pulled off easily – I’m sure you could sand it back too if it doesn’t.
I decided to spray paint the grey of the gem flowers but keep the crystals white. By pulling back on the metal encasing, the crystals came out easily. I only needed to use a finger nail for this but normally I’d use jewellery pliers.
I removed the rings with some heavy duty pliers.They came off pretty easily too. One did break but I can glue that back later.
Black spray paint is what I chose to refashion the jewels. I did two coats on top and one underneath. I left these to dry for most of the day. I think the spray paint should stay on well – if not a coat of clear nail polish I’m sure would do the trick.
Before attaching the clips I put the white gems back into the flowers. They look so much better now!
I’ve never made shoe clips before but I’ve read that it helps to attach felt between the jewellery and finding. I just used a glue gun for this and it seems to have stuck really well. I didn’t position the clips too well though! The black and white flower clipped best so I’d say copy the position of that one.
Here they are, my shoes all glamed up with some lovely, new shoe clips! These turned out so much better than I’d expected!
Here’s my entry into my first Polyvore contest! The theme was to create an outfit that could take you from day to night using items for the Nic and Zoe collection. The dress and cardiagn is from Nic and Zoe, all other items from the Polyvore collection. I don’t normally wear grey as it doesn’t really suit me. So finally here it is! An outfit idea for all of you that look wonderful and gorgeous in grey. I hope I’ve done grey justice for you.
Here’s a tutorial for a simple waterfall/cascade necklace. I absolutely love this style of necklace and they are really simple to make. The basic idea is to create short links of beads and attach them to a main necklace chain. You can add more chains and links to make a more complex necklace, but this tutorial will focus mainly on the simplest style.
You’ll need: About half a metre of jewellery chain (medium to larger width chain will be best), assorted beads (generally larger beads work better for this style), head pins, eye pins, jewellery pliers, necklace clasp. About 30 to 45mins.
1. Decide on a basic style. I think the simplest styles often look the best.
2. The first bead goes on a head pin. This will generally be the largest bead but you can mix it up.
3. Bend the head pin back to 90 degrees and cut back to about 1cm.
4. Create an open loop using the jewellery pliers.
5. Get your second bead and place on eye pin.
6. Bend, cut and loop the headpin as the first bead.
7. Attach the closed eye pin loop to the open loop headpin of the first bead and close with jewellery pliers.
8. Add subsequent beads in the same manner.
9. Once you’ve finished a string of beads, use the open loop on the top bead to attach to the chain. Close with jewellery pliers. Make sure you are attaching beads to the central piece of the chain.
10. Keep making strings of beads and attaching to chain. Space them as you wish. Make sure the chain lays flat and that you’re attaching the loops to the bottom links of the chain.
11. One you’re happy with the number of beads we can begin the finishing touches.
12. Cut back the chain to desired length with jewellery pliers (you can also open one of the a loops to remove chain as in step 15 here – I find it quicker and lazier to judge the length I’ll need by initially cutting back though).
13. I like to leave equal lengths of chain on either side of the beads.
14. Insert the tips of the pliers through the last link to open it. You can also use a second pair of pliers to pull it apart – I usually find this method easier myself.
15. Place a necklace clasp on to the last link and close firmly with the pliers. There are several different types of findings you can use. I’ve chosen to use a simple parrot clasp here.
14. I’m finishing the other end of the necklace off with an extender chain. You don’t really need it here as you can clasp directly onto the chain – but I think it finishes it nicely.
Done!
This necklace cost me about $10 in material. Bargain!
Chains come in a variety of different styles, sizes and colours. So do necklace findings. I generally use parrot clasps as they are secure and fairly strong. The springs in necklace findings don’t always work too well. If you have an option of buying better quality ones I’d go for that. Some of the cheaper ones have broken on me straight away – others have been fine. Other types of findings include magnetic, screw in, toggle and hook.
This style of necklace makes it really easy to create some amazing and unique designs. I’ve compiled a page of design ideas at pinterest here. I included a couple of good youtube tutorials that show how to make similar styles of necklace. If you’re new to making jewellery I suggest watching these as they show how easy it is!
Some other ideas to try are:
Mixing different styles, colours, materials of the beads.
Mixing beads up with charms.
Hanging lines of chain between the beads – or using just chain.
Adding lines of chain between bead loops. This works best when including a split/jump ring between the chain and loops. This is a necklace I bought at Target last year.
Attaching beads to a chandelier finding rather than a chain.