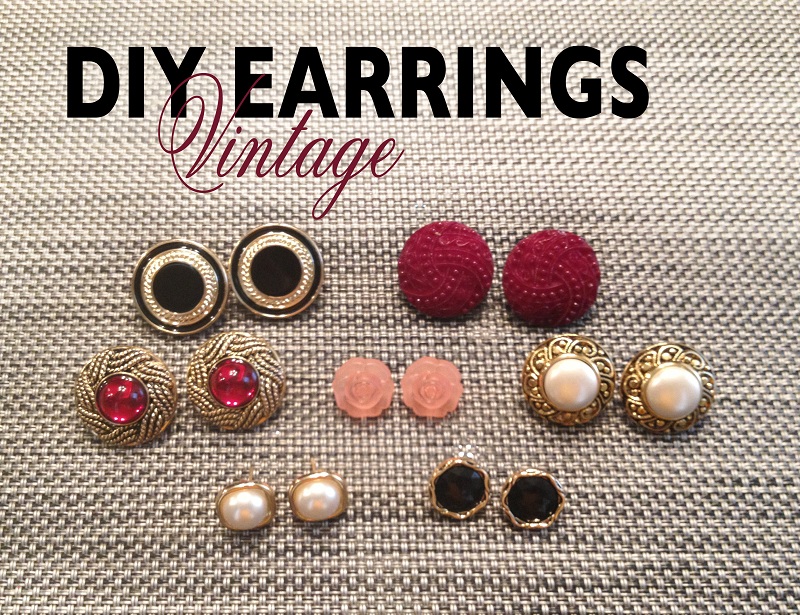
50% of jewellery at Just Jeans this week. A good time for a bargain. A good time for a refashion.
I originally bought just one of these necklaces to wear as a necklace. I thought it was a fun design and absolutely loved the charm pieces it had on it. When I tried wearing it though it just looked weird on me. I knew it wasn’t right. I was about to take it back to the shop when inspiration struck – Buy another necklace – Refashion of the Week.
Breaking up the first necklace:
Here is what I made:
1. A simple earring. There was an extra join at the bottom of this piece that I cut off with jewellery pliers. (I talk more about this in a previous refashion here).
2. Another simple one. Just put this on the hook.
3. For this one I incorporated a couple of beads to make a simple drop earring.
4. I used one of the smaller end pieces to make a drop stud. (I did a DIY on how to make studs here).
5. These are my absolute favourite ones here! I’m going to love wearing these! I had some tassels left over from a previous refashion that were waiting for the right bead to finish – and I found it! Yay! I put these on clip-on findings as they are quite long. ( I talk about this here)
6. These ones came straight from the necklace.
7. I really liked these black pieces and they ended up going perfectly with these flat white beads I had. TIP: I put a little glue on the head pins to stop the white beads from moving about.
8. I’m not sure if I’ll wear this as a necklace yet. I think some basic black beads could look really good on it (I don’t have enough to try it out for you here at the moment sorry) but I quite like it simplified as it is. I hope to turn one of these into a bag clasp. if I do the pic will be going here.
The necklaces were $12 each.
Leftovers:
Extra:
I found these black discs in my refashioning box today – some leftovers from a previous refashion (I think it was from a necklace as well) that I’d completely overlooked! I’m going to love these as earrings now.
These are so simple to make. Once you start, you’ll be making earrings out of everything!!
You’ll need: Earring stud/post findings and backs, assorted small pretty things, superglue. Paper towel, newspaper and gloves are useful too (not pictured). 2 min + setting time.
1. Select some pretty things. 2. Turn them upside down. 3. Apply glue. 4. Apply posts. It will depend on the glue how long it takes to set. Once it’s set it’s ready to wear!
You can use anything to make these with – beads, flat back gems, buttons, sequins, coins, paper, ribbons etc etc.
You can get post findings in a range of different sizes and styles. The posts will hold better when you match the size and weight of the object to the size of the post’s head. Wearing larger backings will also help with bigger, heavier earrings. You can also purchase posts with cone shaped heads that make it easier to attach round objects to (such as beads).
Posts are easily available from most craft shops, online jewellery supply stores and ebay too (there are some links to these sites in my links tab). I buy surgical steel as I have a slight sensitivity to cheaper metals. You can also purchase sterling silver and gold filled posts but these tend to be a lot more expensive (much more expensive than silver/gold hooks). I pay about $2 for 12 pairs of surgical steel.
The glue I used here is called Ultimate Glue by Crafter’s Pick and it’s a non-toxic, water-soluble superglue. I have only had it a week or so but it seems to be holding well. Here are some other glues that would work :
Remember to use gloves and work in a ventilated area when using these glues.
Glue guns can work well too.
Here are a few similar DIYs to mine. These are both really great blogs, lots of fun DIY ideas here!
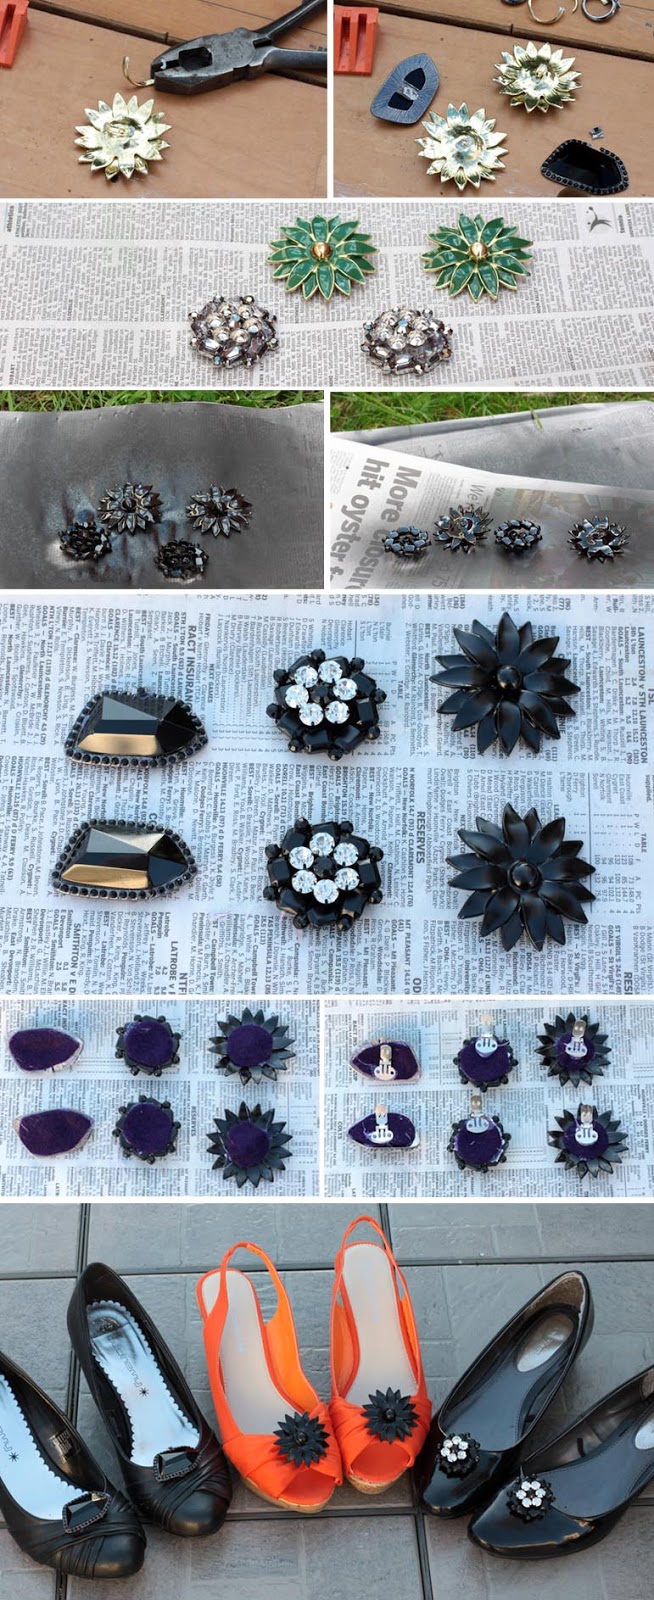
Up until a couple of months ago I had never heard of shoe clips before. If you haven’t either they are basically jewellery for your shoes. I had never seen them in shops and could only find a limited, expensive range of them online. Shoe clip findings were easy to find though! I got these off ebay for a couple of dollars (the packet came with 20).
They had a really great sale on at the jewellery store this week so I bought an assortment of things I could make some shoe clips with – let’s begin refashioning!
For my shoe clip refashion I chose some studs and a few different rings to work with. First I removed the posts from the studs by cutting them back with jewellery pliers. The remaining bit just pulled off easily – I’m sure you could sand it back too if it doesn’t.
I decided to spray paint the grey of the gem flowers but keep the crystals white. By pulling back on the metal encasing, the crystals came out easily. I only needed to use a finger nail for this but normally I’d use jewellery pliers.
I removed the rings with some heavy duty pliers.They came off pretty easily too. One did break but I can glue that back later.
Black spray paint is what I chose to refashion the jewels. I did two coats on top and one underneath. I left these to dry for most of the day. I think the spray paint should stay on well – if not a coat of clear nail polish I’m sure would do the trick.
Before attaching the clips I put the white gems back into the flowers. They look so much better now!
I’ve never made shoe clips before but I’ve read that it helps to attach felt between the jewellery and finding. I just used a glue gun for this and it seems to have stuck really well. I didn’t position the clips too well though! The black and white flower clipped best so I’d say copy the position of that one.
Here they are, my shoes all glamed up with some lovely, new shoe clips! These turned out so much better than I’d expected!
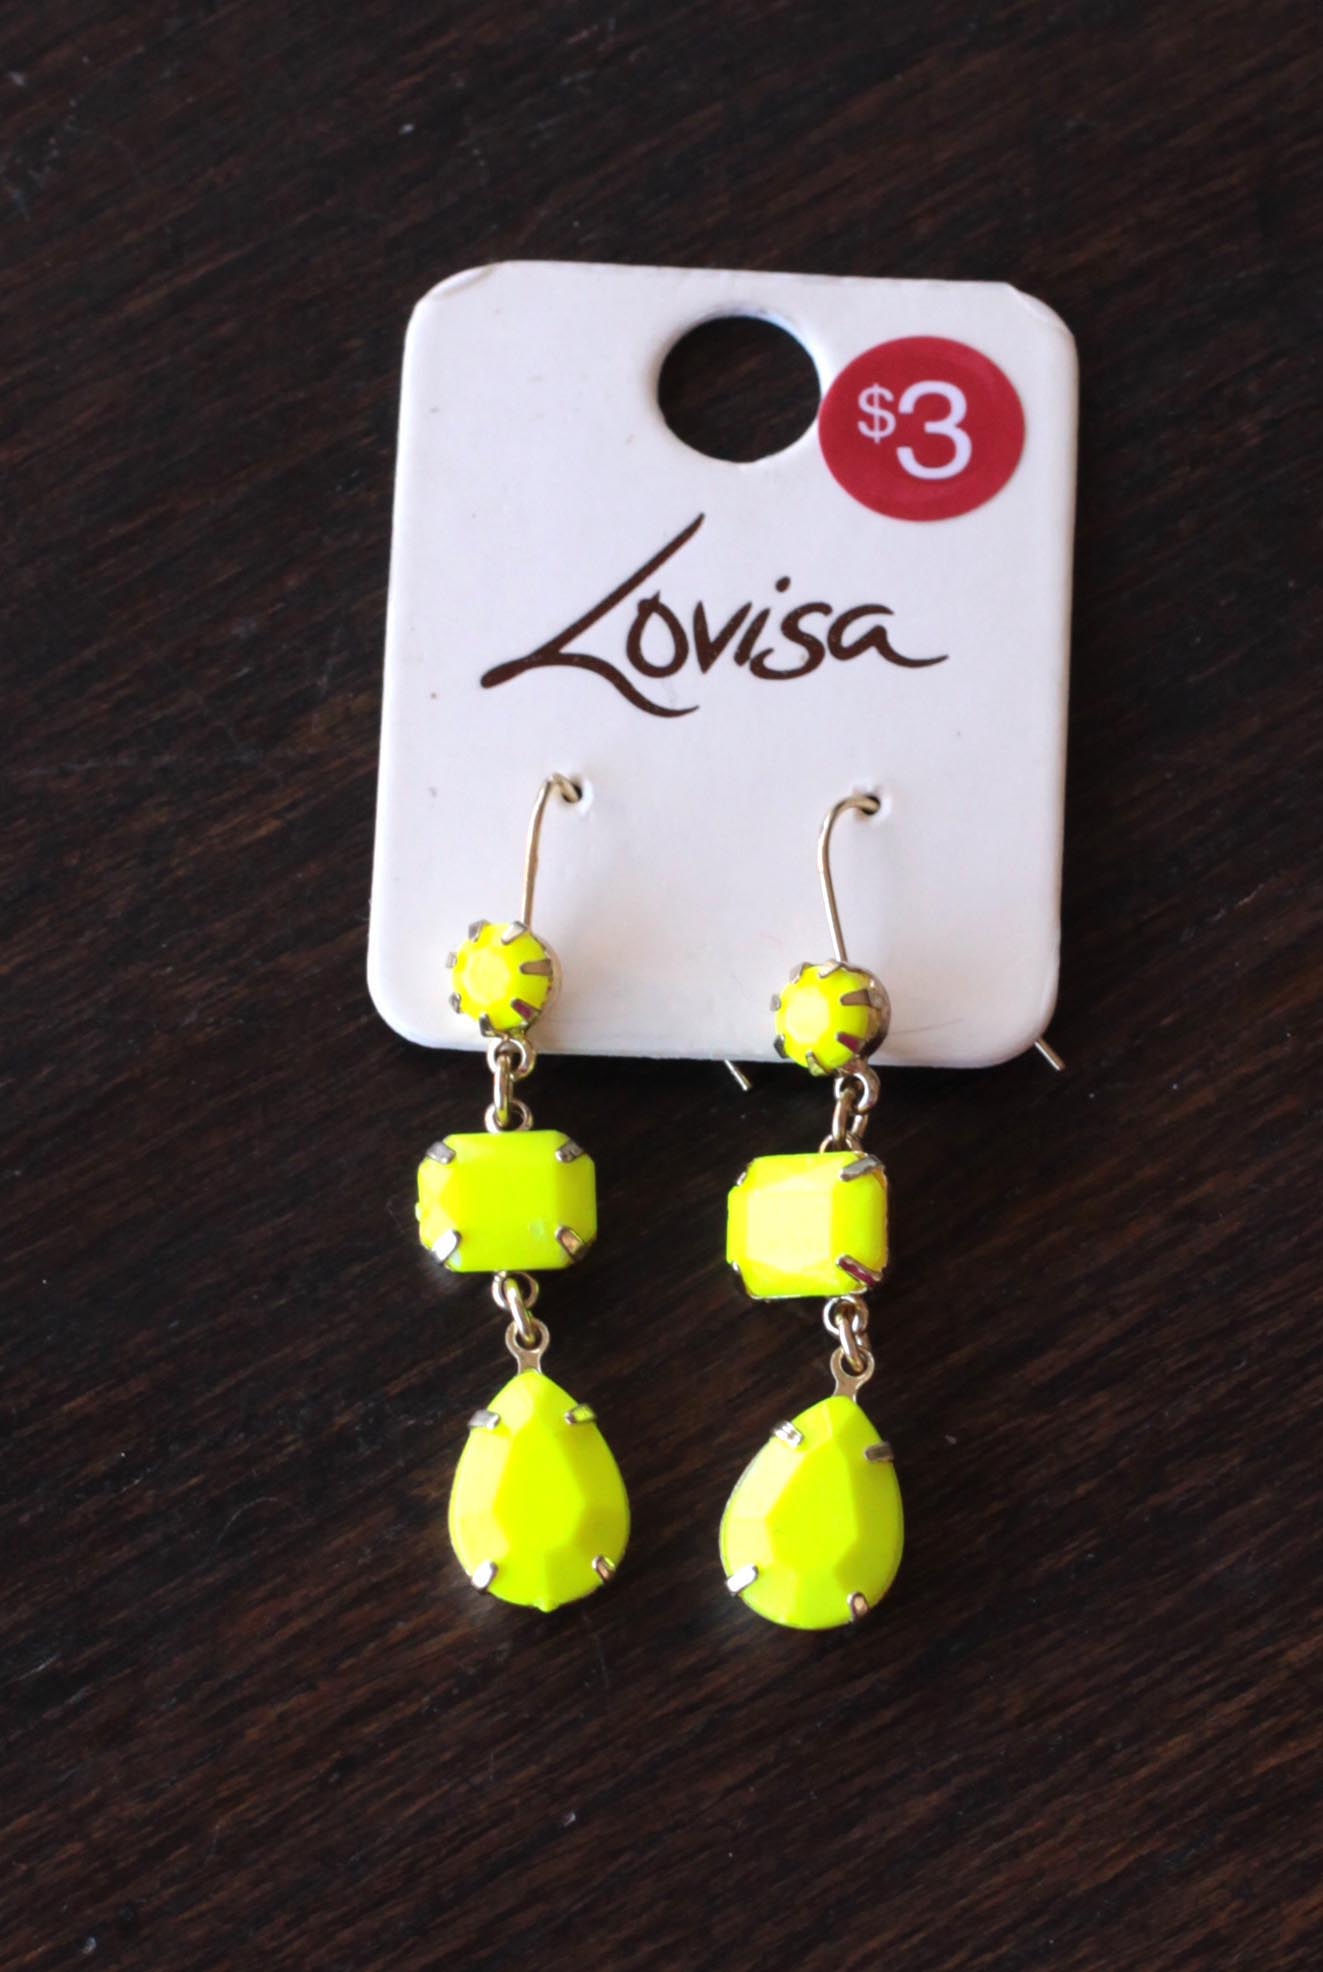
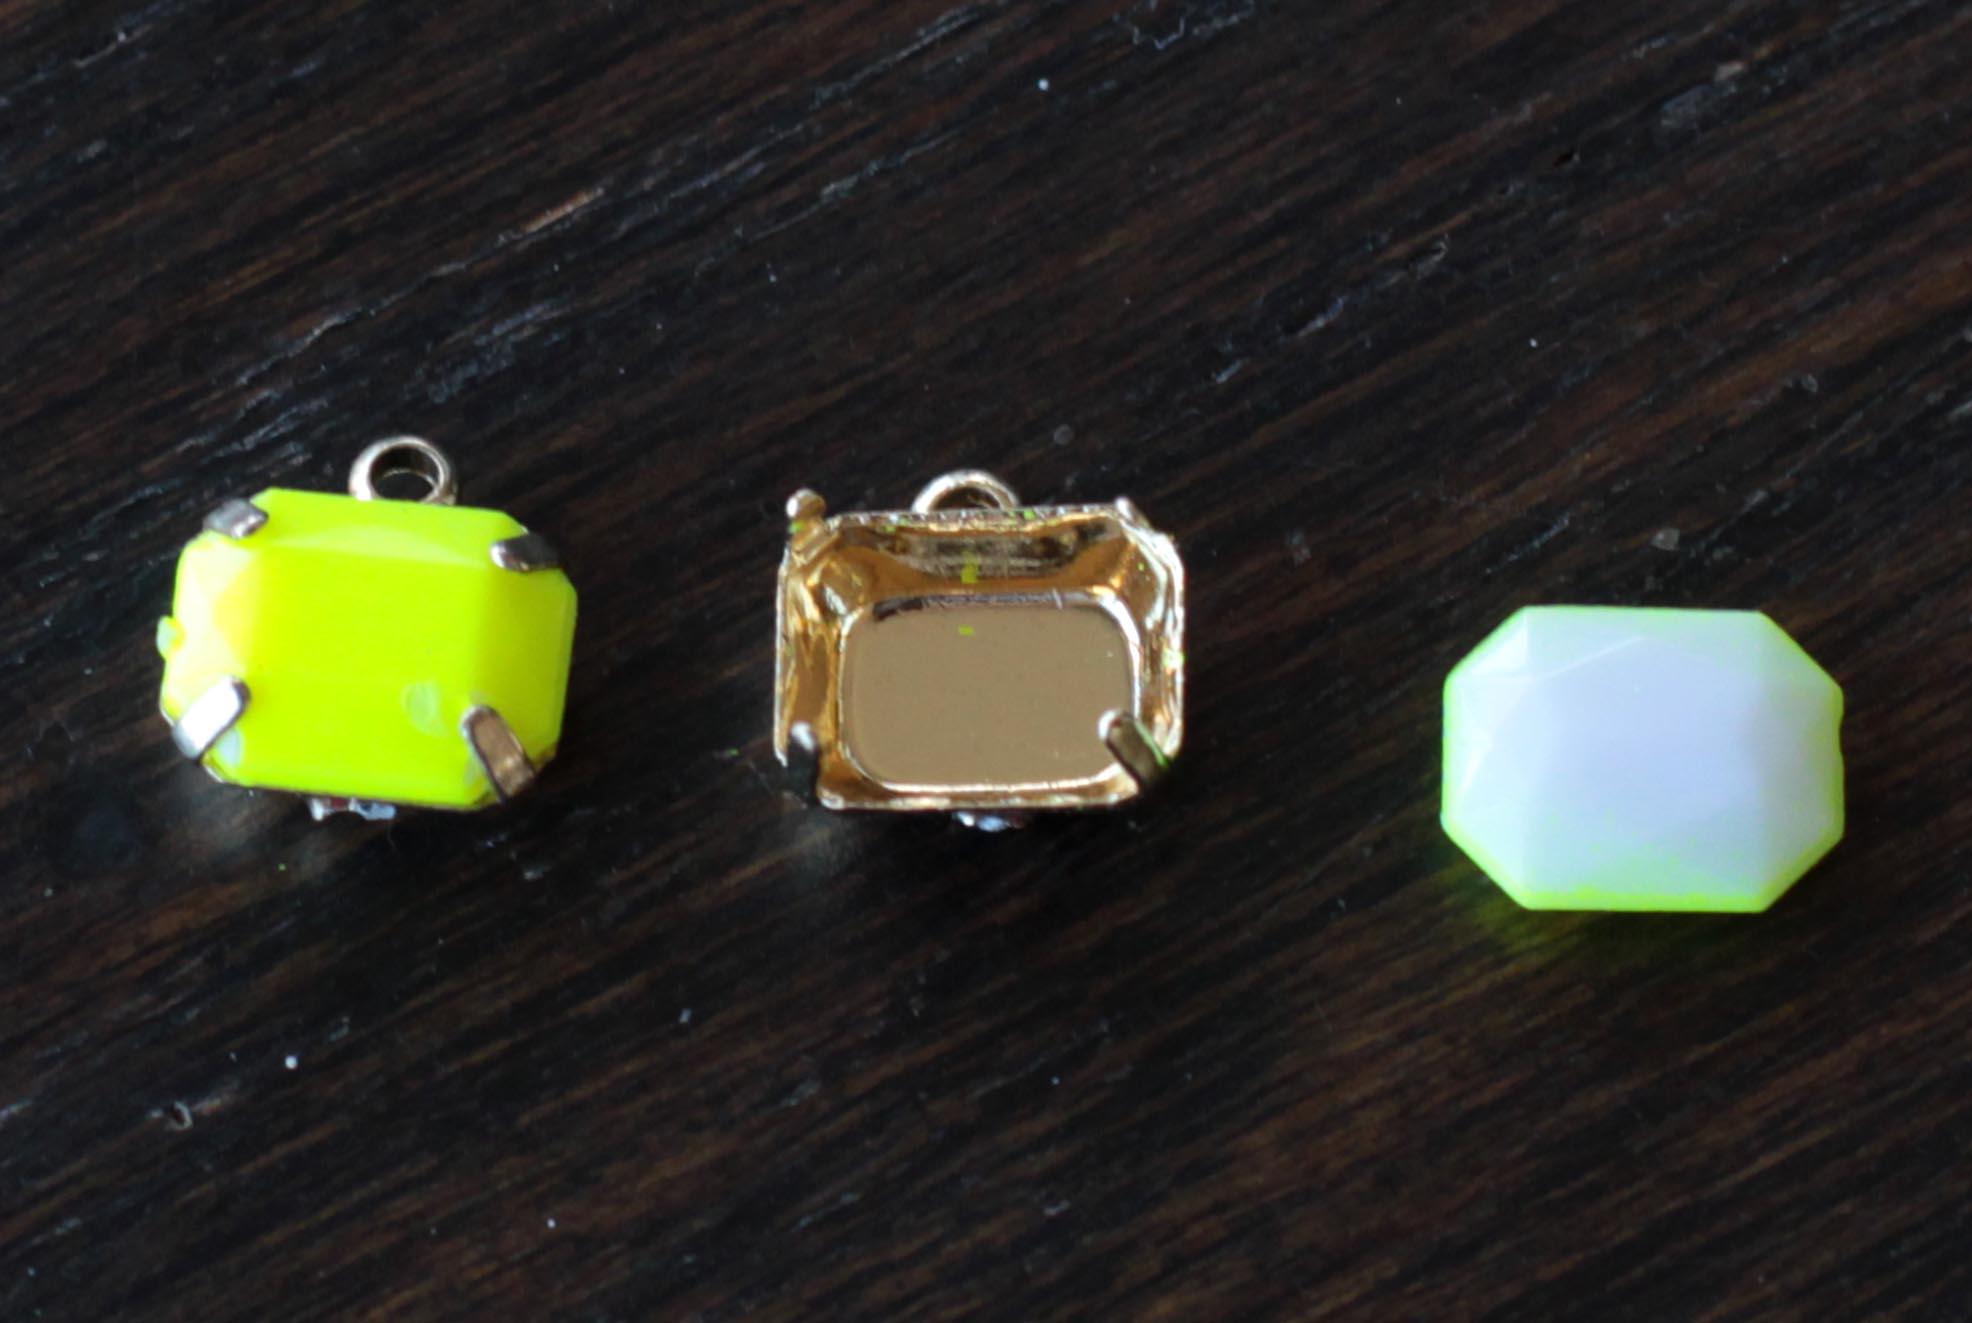
Here are a pair of neon yellow earrings I bought earlier in the week! I absolutely love the colour. The design is nice – but I’m thinking I might like them more after a bit of a change up. Here, I’ll get refashioning.
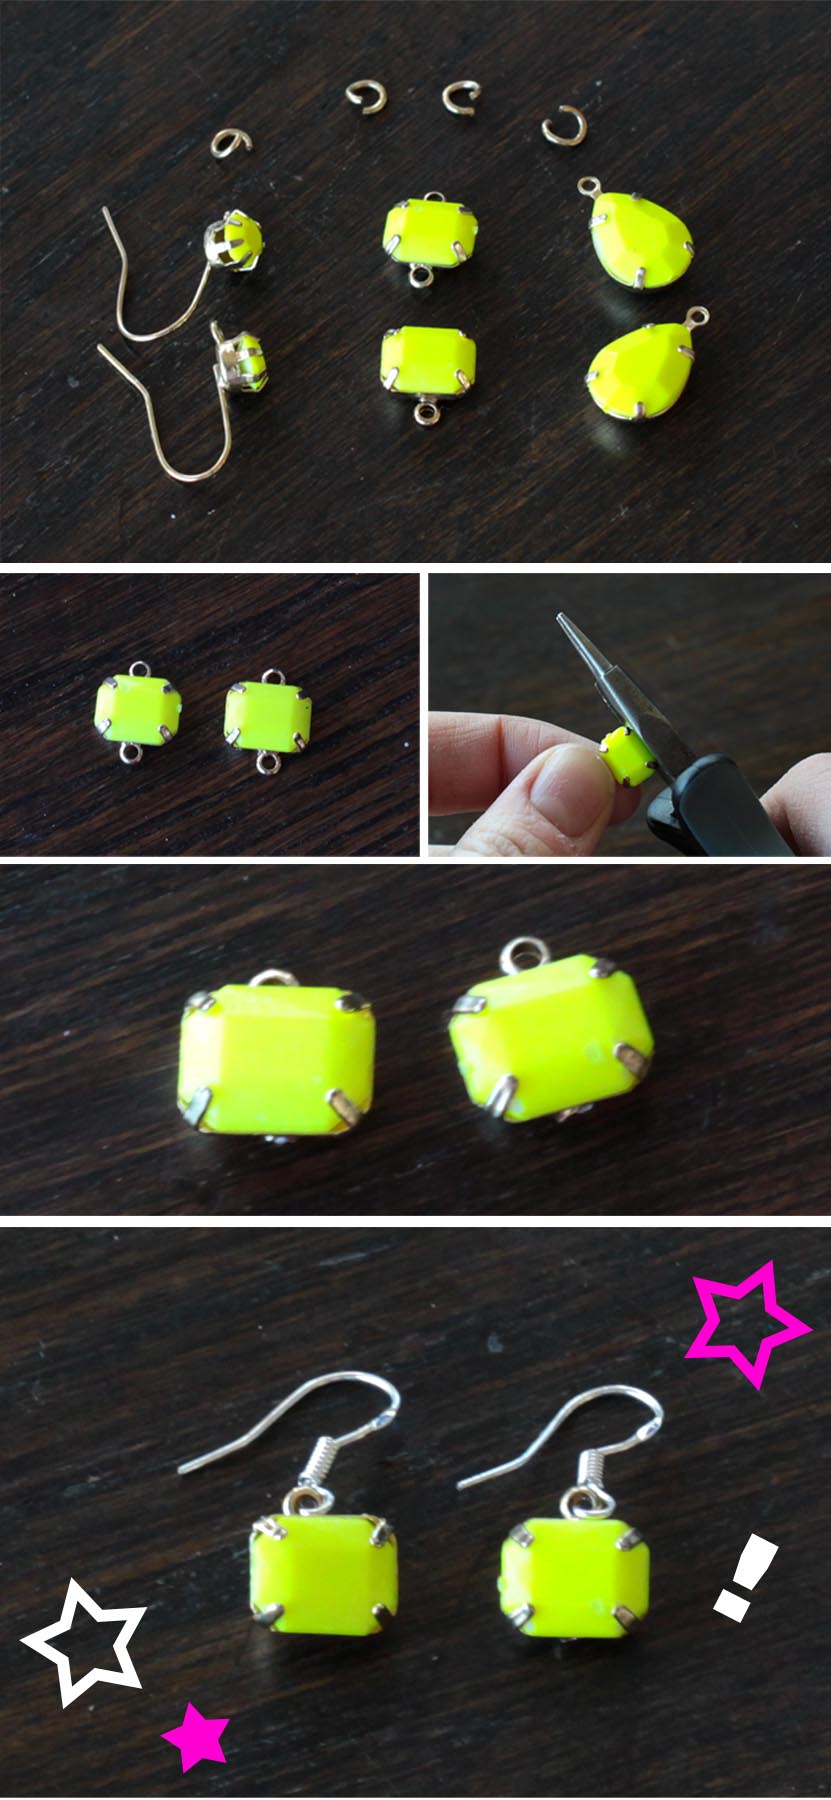
First I broke the earrings apart using jewellery pliers. The rectangle bits are my favourite so I’ll choose them to make a simple drop earring. As there are two loops on these pieces, I’ll need to cut one off. Breaking metal on fashion jewellery is way too easy – a simple pinch with jewellery pliers is all you’ll need here. All I do to finish is add a couple of sterling silver hooks. Too easy! Oh I like these so much more now!
For information about using jewellery pliers and attaching hooks see my previous post.
If you’d like to change the colour of the gem or metal backing all you need to do is pull back the metal bits of the frame with some pliers (or even your nails can be ok). Be careful with the metal as it isn’t overly strong. Spray paint or nail polish are both good for colouring – the under colour of this gem is white anyway!
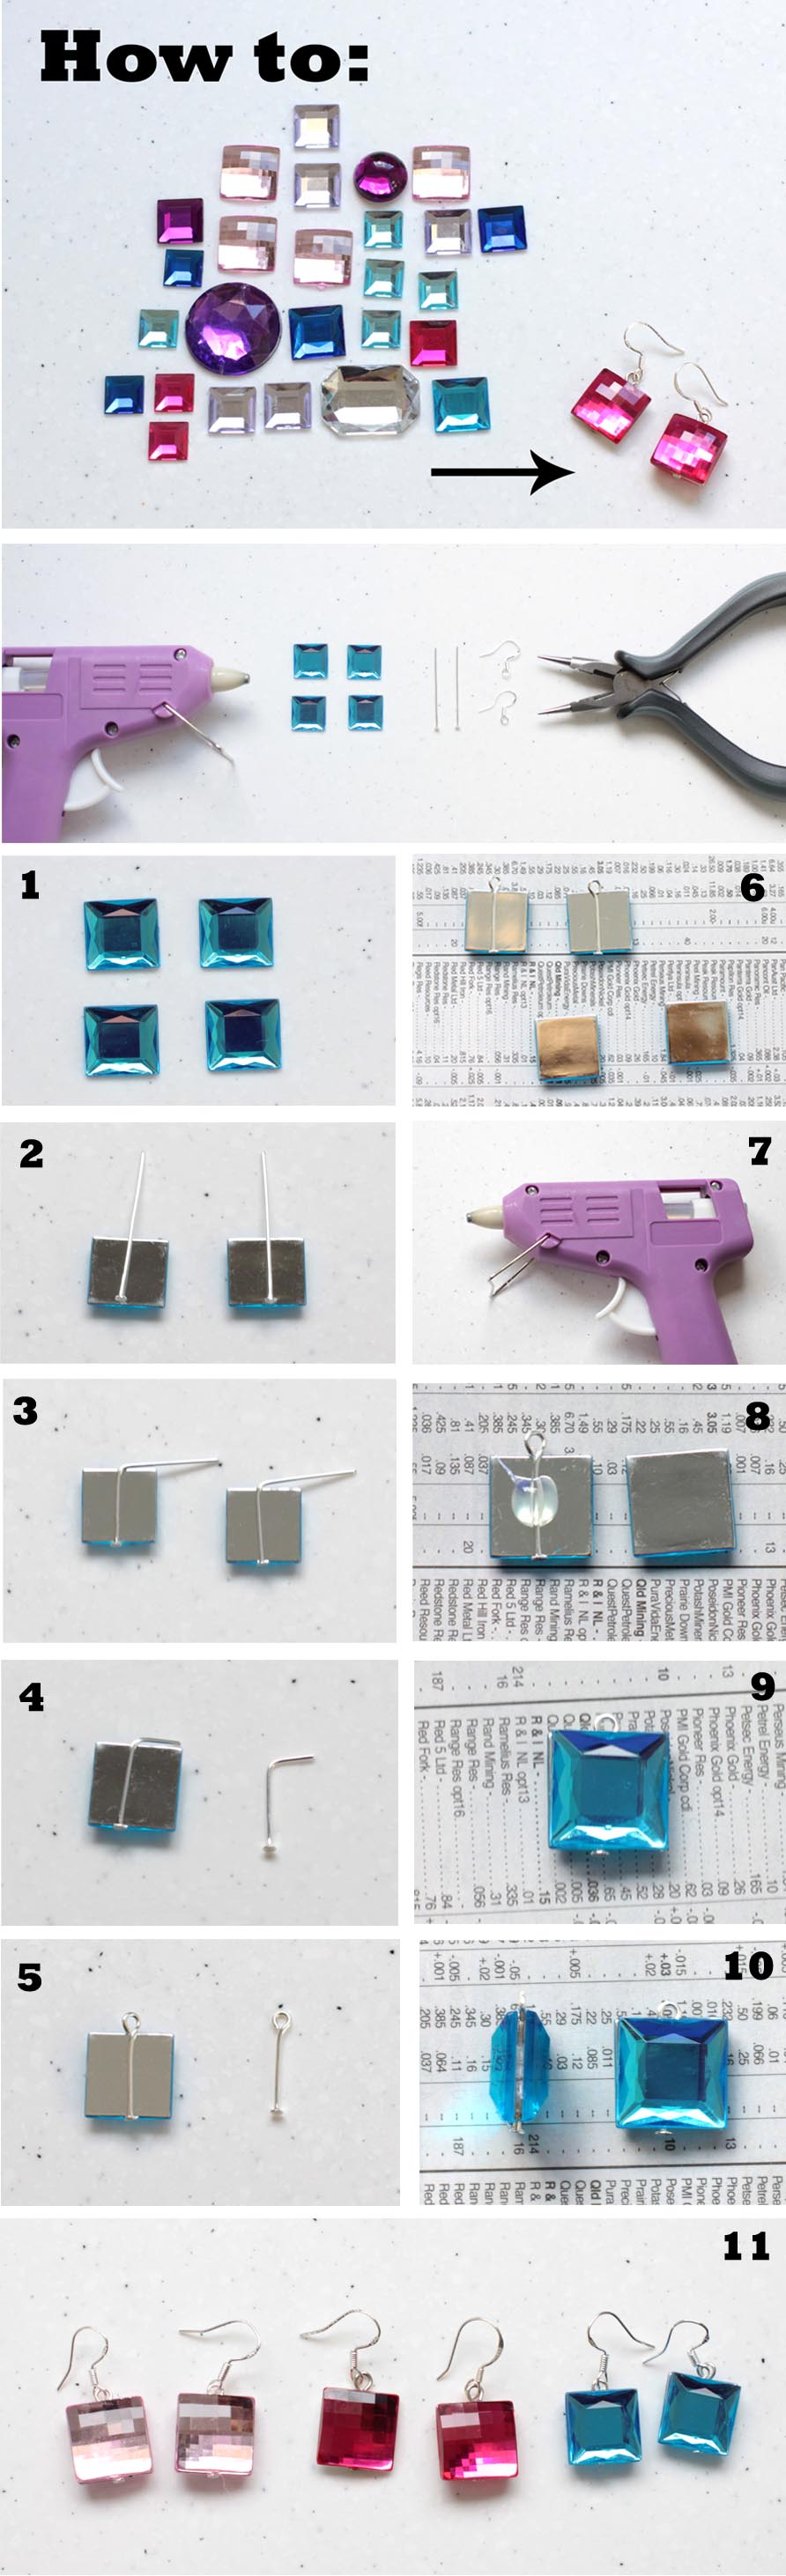
Here’s a quick tutorial on how to make yourself an inexpensive and very lovely pair of earrings! These are made by sandwiching a headpin between two flat back gems (also called rhinestones, crystals or glue-on gems).
You’ll need: 4 flat black gems, 2 head pins, 2 hooks, jewellery pliers and a hot glue gun. For more information regarding jewellery hooks and pliers see myprevious post here. For information on creating basic earrings see this post.
1. Get the gems ready.
2. Lay headpins in centre of gems with end of headpin lined up with base of gem.
3. Bend the headpin to a 90 degree angle by pressing back over the top of the gem – you’ll need to hold the headpin in place while you do this.
4. Using the jewellery pliers, cut the headpin back to leave approximately 1cm of metal.
5. Make a loop at top of headpin.
6. Place gems on newspaper. Centre headpins on top.
7. Get glue gun ready.
8. Place a dab of hot glue in centre – you won’t that need much.
9. Place the other gem on top. You’ll have about 5-10 seconds to move the gem about before the glue sets. First check that the headpin is centred and the base of pin is sitting at exactly the base of gem. Next make sure the two gems are aligned perfectly on top of each other, then check the sides to see if the width of gap between them is even.
10. Here is what they should look like.
11. Add hooks and they are ready to wear!
These are super quick and easy earrings to make. It will probably take a few goes before you get good results though, so I would recommend practicing on the gems you like least first.
Gems are easily available from craft shops and online craft/jewellery stores in a variety of shapes and colours. See my links page for some potential suppliers. They do come is varying degrees of quality. The ones I have pictured were just basic ones from a local craft shop – I got a packet of about 20 for $4. I have bought some much cheaper ones in bulk and did notice quite a big drop in quality – their foils were scratched and their surfaces fairly dull. Swarovski make some extremely beautiful glass ones – they are $5 or so each though. In the coming months I’ll do a tutorial on making your own extra special unique ones!
The hot glue should hold the gems together well. I have had a pair fall apart while transporting them in a box of other earrings. They should be easy to fix with a tiny bit more glue, but if you want to make sure they are super strong I’d suggested filling the gap with some super glue. If the gap bothers you I have a few ideas. You could fill gap in with glue and paint the sides with paint or nail polish. There is also something which I think is called mapping tape. It is basically very thin tape. The one I have is black and just a tiny bit larger than the gap between gems. I have tried doing a pair with the tape, beginning it to on one side of the loop and finishing it at the other. It looked ok but didn’t stick too well on its on – I had to use glue and in the end it all became a bit awkward. I’m sure it’s doable. I think they look absolutely fine with a gap though.
One other issue I’ve noticed is that the hot glue can mark the silver foil on particular gems, which will then show through on the finished earrings. It usually won’t be that noticeable but if it really bugs you you could try painting a layer of mod podge or some other sealant on the foil before using the hot glue.
Here is another idea. The sew-on gems come with holes already drilled into them so you can put an earring hook in straight away. You will probably need to increase the size of the hook’s loop to be able to do this – see this previous postfor more information on how to do that (you’ll find it halfway done the post). You may also want to apply a layer of mod podge to back of gem foil so it doesn’t get scratched. I have tried drilling holes into some of the other gems – this didn’t work at all and nearly broke the drill bit! Try at own risk!
You could also attach an earring post finding to one of the flatback’s with jewellery glue. I’ll write more about making earring posts later. Post findings would be available at any of the supply sites in my links tab.
I’ll be writing more tutorials on making jewellery and accessories from flat back gems soon – I love them so much! Would love to hear about your experience with this.
Here are some of my latest jewellery designs I’ve been working on. These will be earrings. They are made from resin and photo paper. I draw the patterns myself, print them and apply a thin layer of jeweller’s resin on top. I plan to use a solid black resin on the back and finish with sterling silver findings. The earrings are about an inch by an inch large. I hope to begin some resin tutorials here sometime soon. I’m still new to working with resin so a lot of learning is still required for me! All these are pure, saturated hues, which haven’t translated too well in the photo. The checked pattern is much shaper too and polka dots pure white.


%20Earrings)