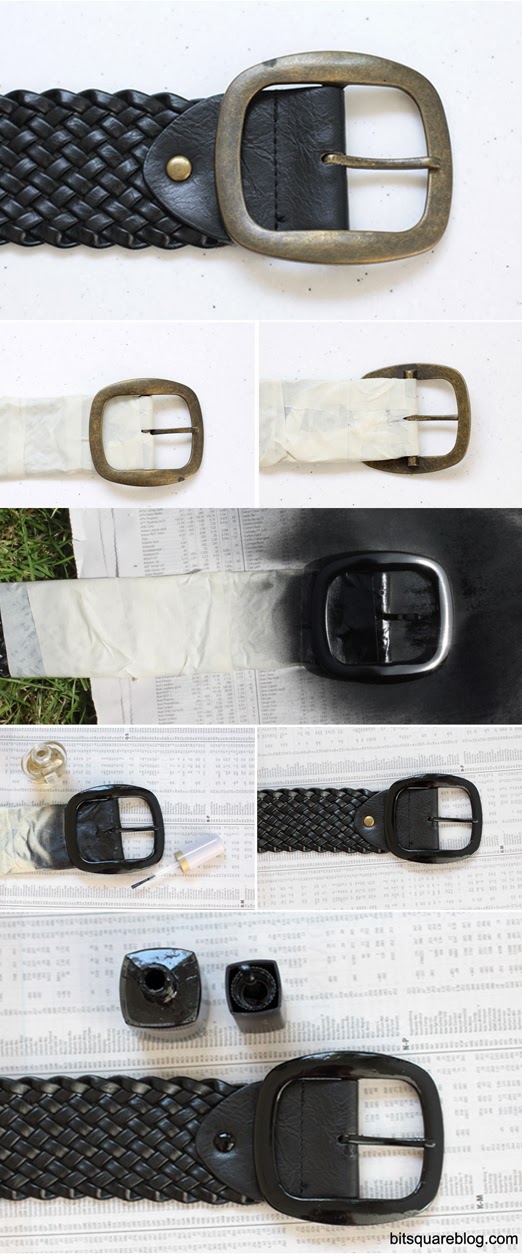
I actually did a belt buckle refashion a while back with nail polish but I thought I’d try spray paint this time.
This ended up working really well! I made sure to cover up the belt before painting with masking tape. I then did two coats on both sides of the buckle and left it to dry overnight. The next day I painted a gloss finish on top with clear nail polish (this wouldn’t be necessary but it definitely improved the finish and I imagine it will help the paint stay longer too). I also used some black nail polish to paint the stud (I used a toothpick to paint right down into the sides).
I really like how this belt looks with a black buckle. This finish is so much nicer than the one I did with nail polish too. Yay! Hopefully I’ll get lots of wear out of this now.
I’ve been on the lookout for a great white and silver statement necklace for the last year or so, and I’ve been looking especially hard over the summer too. As it happened I ended up coming across all four of these over the after Christmas sales!! I was particularly thrilled about finding these two pearl ones as they are both super fun as well as being rather dressy. The pearls on the black ribbon I picked up for $3!!!
As I can’t find any of these online I took pics myself. They should all be still in stores though. :)
1. This necklace was a gift but I know it’s from Myers as I helped choose it – it’s by Basque. The silver beads are so lovely and shiny and it makes such a great statement piece. It’s bigger than it looks here and is quite heavy too, although I hardly notice it when it’s on.
2. This necklace was from Divaat Melbourne Central. I’ve actually looked for it in a couple of other stores and they didn’t have it – it’s not online either. So if you’re in Melbourne, there were quite a few there. I imagine it’s new stock so hopefully it will be around if you like it. I absolutely LOVE this necklace. The pearls are a really nice white and it has glittery rhinestone beads too.
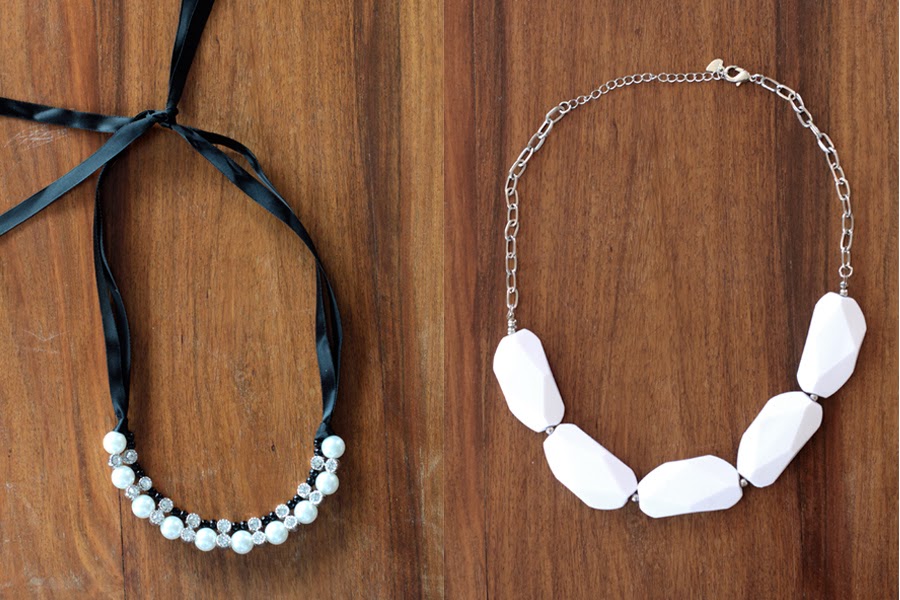
3. My $3 pearl necklace was from Target. It was in the sale racks but there were a few of them left when I bought it. It’s really pretty. It has large bobbly pearls alternating with rhinestones and black beads. I love the black satin ribbon too.
4. This was another necklace from Diva. They have it in both gold or silver findings (and I think there were some different colours too). It’s a great simple white statement necklace that is going to go with everything (it is especially pretty against solid black though). If you look below you will see my little refashion.
The necklace actually came with two strands. It sat a bit funny on me so I clipped one of them off with my jewellery pliers. I’m not sure what do do with the other strand yet. It may become a bracelet, or another necklace. :)
So if you are in Australia and looking for a neutral statement necklace I hope this might be of help. Oh and Lovisa have a few lovely white and gold ones at the moment too and there is a pretty white beaded tassel one still at Myers (not online either I’m sorry).
I haven’t come across that many on the International sites lately to recommend unfortunately. Shop Style or The Find are great places to search for them if your interested.
I think I might do a 5 ways with a white necklace in the next few days too.
What’s your favourite style/colour of neutral necklace?
PS: The big white daisy clip in the top photo is from Lovisa. They have lots of fun daisies at the moment!
A fairly simple 5 Ways this week. I came across this amazing bib necklace at BaubleBar during the week. I absolutely love the style of this! It’s got quite an exotic, playful quality but is also really modern and stylised too. I have actually seen a few similar versions about this season. This one here though is by far my favourite in terms of colour and metal.
As this piece is such a statement in itself I styled it really simply here and let it be the focus of the outfits. I chose colours that both highlighted and complimented it – pink, light blue, navy, black, silver and white (of course it would also look incredible with many others too). I love the work outfit in particular – imagine wearing this with a suit! – so fun! I think the black sets it off the most though. For me it’s the prettiest in these looks.
Click image for other item details at Polyvore
I just grabbed these clothes from the vaults but most should be still for sale. :)
This set was inspired by the Type 4 (Bold/Striking) Dressing Your Truth style. You can learn more about Dressing Your Truth at their siteor there is lots to see at youtube too!
How incredible are these! These are some of my favourites from my last week’s online browsing. Most of these are from Amazon if you’d believe and under $25 too! (Quite a few of the more special ones are on sale at the moment). Amazon truly has the most incredible range of earrings/jewellery – I absolutely LOVE looking there. I included a few from Nordstroms as well – these were a little more expensive though but I thought were so great I had to include them.
I think my favourites are the polka dot feathers and the blue crystals.
What about you?Which ones do you like best??
If you’re sensitive to earring hooks don’t miss out! This post has some great solutions