An interactive capsule wardrobe today. I’ve selected some of my favourite new items from Polyvore here that hopefully work fairly well together. Use the arrows to scroll through. There should be about 12 items per carousel. Click on any of the items for it’s website and details. I’m not sure if these are all for sale.
Take a screenshot if you come up with some great combos! PC – Alt + PrintScreen (PrtScn) (should be saved to clipboard) Mac – Command + Shift + 4 (should be saved to desktop)
50% of jewellery at Just Jeans this week. A good time for a bargain. A good time for a refashion.
I originally bought just one of these necklaces to wear as a necklace. I thought it was a fun design and absolutely loved the charm pieces it had on it. When I tried wearing it though it just looked weird on me. I knew it wasn’t right. I was about to take it back to the shop when inspiration struck – Buy another necklace – Refashion of the Week.
Breaking up the first necklace:
Here is what I made:
1. A simple earring. There was an extra join at the bottom of this piece that I cut off with jewellery pliers. (I talk more about this in a previous refashion here).
2. Another simple one. Just put this on the hook.
3. For this one I incorporated a couple of beads to make a simple drop earring.
4. I used one of the smaller end pieces to make a drop stud. (I did a DIY on how to make studs here).
5. These are my absolute favourite ones here! I’m going to love wearing these! I had some tassels left over from a previous refashion that were waiting for the right bead to finish – and I found it! Yay! I put these on clip-on findings as they are quite long. ( I talk about this here)
6. These ones came straight from the necklace.
7. I really liked these black pieces and they ended up going perfectly with these flat white beads I had. TIP: I put a little glue on the head pins to stop the white beads from moving about.
8. I’m not sure if I’ll wear this as a necklace yet. I think some basic black beads could look really good on it (I don’t have enough to try it out for you here at the moment sorry) but I quite like it simplified as it is. I hope to turn one of these into a bag clasp. if I do the pic will be going here.
The necklaces were $12 each.
Leftovers:
Extra:
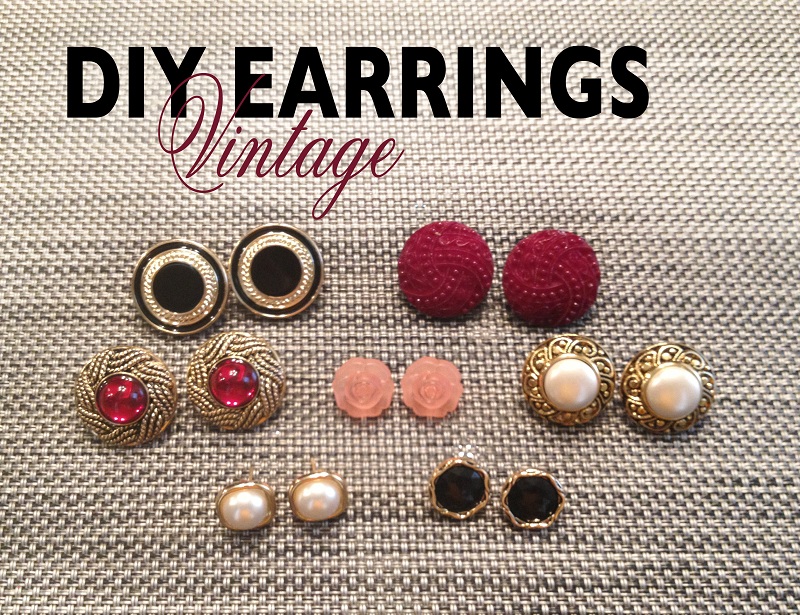
I found these black discs in my refashioning box today – some leftovers from a previous refashion (I think it was from a necklace as well) that I’d completely overlooked! I’m going to love these as earrings now.
These are so simple to make. Once you start, you’ll be making earrings out of everything!!
You’ll need: Earring stud/post findings and backs, assorted small pretty things, superglue. Paper towel, newspaper and gloves are useful too (not pictured). 2 min + setting time.
1. Select some pretty things. 2. Turn them upside down. 3. Apply glue. 4. Apply posts. It will depend on the glue how long it takes to set. Once it’s set it’s ready to wear!
You can use anything to make these with – beads, flat back gems, buttons, sequins, coins, paper, ribbons etc etc.
You can get post findings in a range of different sizes and styles. The posts will hold better when you match the size and weight of the object to the size of the post’s head. Wearing larger backings will also help with bigger, heavier earrings. You can also purchase posts with cone shaped heads that make it easier to attach round objects to (such as beads).
Posts are easily available from most craft shops, online jewellery supply stores and ebay too (there are some links to these sites in my links tab). I buy surgical steel as I have a slight sensitivity to cheaper metals. You can also purchase sterling silver and gold filled posts but these tend to be a lot more expensive (much more expensive than silver/gold hooks). I pay about $2 for 12 pairs of surgical steel.
The glue I used here is called Ultimate Glue by Crafter’s Pick and it’s a non-toxic, water-soluble superglue. I have only had it a week or so but it seems to be holding well. Here are some other glues that would work :
Remember to use gloves and work in a ventilated area when using these glues.
Glue guns can work well too.
Here are a few similar DIYs to mine. These are both really great blogs, lots of fun DIY ideas here!
Do your remember this black scarf I bought on my $50 shop? Well I did have an ulterior motive for buying this!…….. Adding sew-on gems!!!!
This scarf was really wide so I folded in half and sewed the sides together.
I then folded in half again.
The gems I bought were just from the local craft store, it was a really good packet as it had a mix of all sorts of shapes and colours.
I arranged the gems into a flower pattern. I’m sure any pattern would look great here – flat-back gems look amazing on anything.
After all the gems were in place I proceeded to glue them on with super glue. The one I used here is a new purchase that I’m very excited about. It’s called Ultimate Glue by Crafter’s Pick and it’s a non-toxic, water-soluble superglue.
Remember to use gloves and work in a ventilated area when you are using stronger glues.
Once all the gems were glued I proceeded to sew them on (this really in an optional step, if you use enough glue if should hold them well-enough).
It did take a while to sew this (1hr). Just as well I recorded The Voice the other night! Go Celia, Jackie and Harrison!
I actually only had enough gems to do a bit less that half of it – but I don’t think it really needs more and sits better by being quite minimal.
This amazing necklace is what first inspired me to make the scarf. I bought it from Portmans earlier in the year. I originally got the gems with the plan of making a similar necklace. I’m still going to try to make something like this but I thought a scarf is more appropriate for this time of year (Autumn for me).
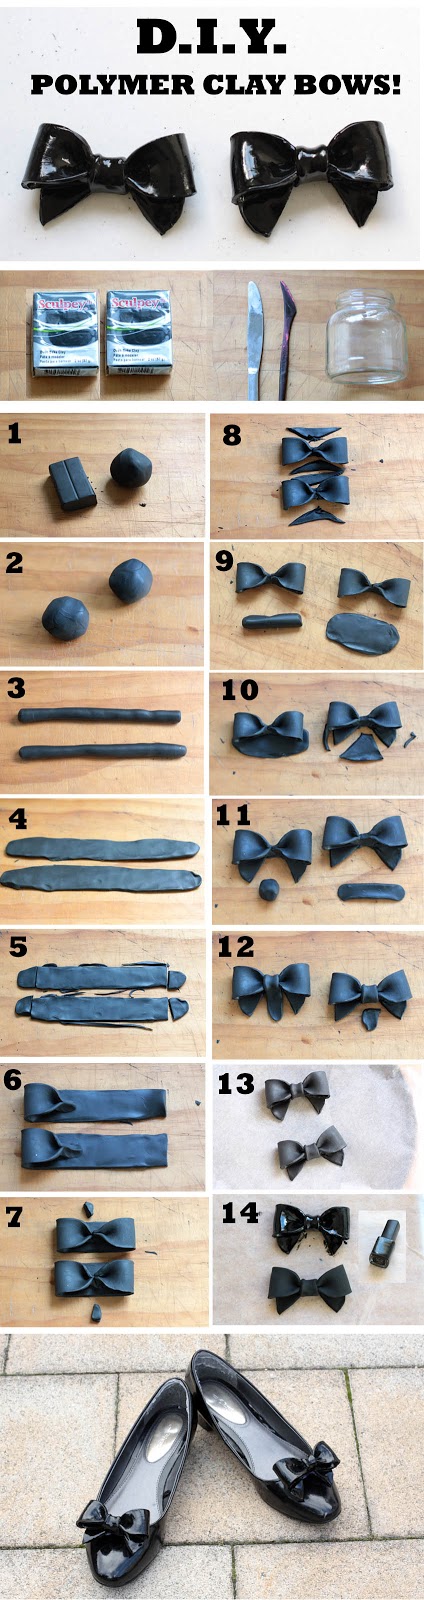
Polymer Clay Bows are so simple and fun to make. Here is a tutorial.
You will need: Polymer Clay, an old chopping board or plastic mat to work on, a cutting implement, a glass jar or old rolling pin, polymer clay gloss, an oven
1. Spilt your clay in half.
2. Roll into balls.
3. Roll out the balls of clay into sausages.
4. Flatten out with rolling pin or glass jar.
5. Neaten up edges of clay.
6. Pinch two on the end corners together and bring into the centre.
7. Repeat with other end of clay – you may need to trim some of the clay off so that they sit close together.
8. Trim around the clay to leave a bow shape.
9. Make two sausages a little smaller than the bows. Flatten them out into ovals with rolling pin.
10. Place bows onto the top of the ovals. Cut out a triangle shape in centre.
11. Get two smaller balls of clay and flatten out as pictured.
12. Wrap this length of clay around the centre of bow. Trim as necessary.
13. Place bows onto baking sheet. Bake to packet instructions (I baked this sized bow at 130oC/275oF for 25mins).
14. Allow the bows to cool slightly. Apply a polymer clay gloss for a shiny finish.
Polymer clay is available at most craft stores and art supply shops. It’s usually about $4 a packet. I used one and a half packets for these. You could make these bows into anything! Earrings, necklace pendants, charms, rings, brooches, belt buckles, hair clips or handbag clips as a few suggestions. I’ve already done most of these!
I made today’s bows into shoe-clips. I purchased the shoe-clip findings off ebay (they were very cheap) and used a glue gun to attach them. I glued felt between the finding and the bow to help strengthen the bond.
Here is a tutorial off youtube too. This is where I first got the inspiration to make polymer clay bows. This is great to watch as it demonstrates how easy and quick bows are to make!
Updated Note: I originally made these bows using nail polish as a gloss and have had comments since warning me that the polish can eat away at the clay over time. Although this is yet to be my experience it does sound like this happens to a lot of people (perhaps it’s dependant on the specific formulation of the polish?) so if you’re worried about it I’d recommend sticking to the polymer clay glosses instead – especially if you are making them to sell or gift.
I got this super cute star necklace at Big W this week. I love the charms! I’m finding it a little bit too busy for me though. Time for a refashion!
I removed the charms and created a new bracelet and some earrings for myself. I got to say, I think these will be one of my new favourite pairs of earrings! The chain for the bracelet is one I had before. I also added an extra star charm I had lying about. I wrote a similar DIY/Refashion about this a few weeks back too if you’d like to learn more about how I did this. Now I’ll have to think up a way to use these lovely necklace chains!


%20Earrings)